Showing posts with label dried fruit. Show all posts

Wednesday, April 15, 2015

Pineapple Rings--How to make dehydrated Pineapple Rings

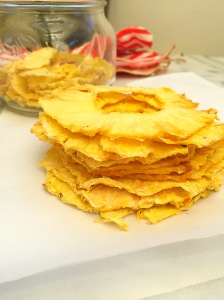
Dehydrated Pineapple Rings
One of my go to snacks is dehydrated fruit.  I'm a particular fan of pineapple rings.  But, if you've ever purchased organic dehydrated pineapple rings, then you probably know that pineapple rings are a snack that can be out right expensive! I mean outlandishly expensive! On top of the expense, it's pretty hard to find pineapple rings that haven't been soaked in baths of sugar.  I'm not a fan of adding sugar to dehydrated fruit.  It's sort of an oxymoron to me that sugar is added to dehydrated fruit at all, because if you know anything about dehydration--then you know that the sugar in fruits concentrate when dehydrated, so there really isn't a need to add sugar--unless you're dehydrating something really tart like cranberries then I could see the purpose of adding sugar. Last week I purchased a pineapple, I fully intended to eat it fresh. However,when I cut, and tasted it-- it was pretty tasteless. Disappointing for sure. The pineapple clearly needed to ferment more.  Rather than chuck it, I sliced it and put it in the dehydrator and made pineapple rings. The resulting pineapple rings were not only flavorful, but they were sweet--everything you want would want in a fresh bite of pineapple--minus the juice of course.  The pineapple rings lasted all of 2 minutes, my sister in-law, my niece and Page, gobbled them right up--I'm pretty sure they would've passed on the fresh slices.

Pin It!
 
 
Prep time: 10 minutes
Cook time 6-8 hrs 10-12hr for thicker slices
Ingredients:
2 whole fair trade organic pineapple
Directions: Remove the stem from the pineapple, then slice off the top and bottom.  Slice off the skin, making sure to remove all the eyelets.
image
Now slice the pineapple thinly.
image
Keep in mind that the thicker you slice it, the longer it will take to dry.  If it's too thin your pineapple rings will turn out crisp, if they are a bit thicker, they'll be more leathery, so it' just a matter of what you're seeking in consistency.  After slicing, cut out the center core by carving a circular cut in the middle of the pineapple.
image
Remove the core and discard it.
image
Place the pineapple rings on your dehydrator sheet,
image
Set the dehydrator to 135F.  If you're doing this in the oven, set the oven to 150F or the lowest possible setting.  Dehydrate for 6-8 hours, 10-12hrs if you cut thicker slices.
image
Once dry let cool, then enjoy!
image
Page could not wait for me to take a picture, she loves these so much!
image
image
if you like this recipe, try the recipe for my pineapple fruit roll-ups!

Wednesday, June 11, 2014

Strawberry Apple Fruit Roll-Ups


Strawberry-Apple Fruit Roll-ups

Now that summer has arrived we are constantly on the go.  Which means that we spend much more time in the car.  My daughter does surprisingly well on car rides, however, she does better if I am armed with plenty of games to fill her time, and of course snacks don't hurt.  She is extremely fond of apple strings--apples that I run through my vegetable spiralizer on the spaghetti attachment, however they oxidize so quickly after making them, I like to save those for home snacks.  Enter fruit roll-ups, she loves them and they are extremely travel friendly.  If you follow this blog, then you know I have several recipes for fruit rolls ups my tropical punch fruit roll-ups are my absolute favorite, but the pineapple, or strawberry fruit roll ups are equally as delicious!

Ingredients:

10 ounces of strawberries stems removed
2 medium sized apples, cores removed

Directions: Place the strawberries and apples in a blender and blend until smooth.  


Pour the mixture out onto a parchment lined sheet and smooth into a thin layer.


Place in a dehydrator on 134 for 4-6 hours, or in a oven on the lowest setting for 4-6 hours.
Fruit roll-ups are done when you can peel them off of the parchment without them sticking.

Friday, November 15, 2013

Homemade Granola Bars with Cranberries & Walnuts

Homemade Granola Fruit and Nut Bars

I don't know about you, but around this time of the year, I start to scale back on my weekday cooking in order to prepare my refrigerator for all of the things I am making for Thanksgiving. This year my self imposed scale back has nothing to do with needing room for my thanksgiving dishes, instead I'm scaling back in preparation for not being home. We are joining millions of travelers this year, we are going to visit my in-laws in Nevada for Thanksgiving. Since we'll be in the car for more than 3 hours, I decided to prepare some healthy snacks for us to munch on during the drive. This granola bar fits the bill perfectly. It has nuts, 3 kinds of fruit, and no refined sugar!

Prep time: 10 minutes
Cook time: 10 minutes
Total time: 20 minutes

Ingredients:
3/4 cup of maple syrup
2 tablespoons coconut oil or butter plus more for oiling the baking dish
2 cups old-fashioned rolled oats
1 1/3 cups chopped nuts I used walnuts
1/4 teaspoon sea salt
1 cup of dried fruit, I used a mixture of sour cherries, cranberries, and raisins
1/3 cup creamy almond or peanut butter
1/4 cup honey

Directions:
Preheat oven to 375 degrees. In a small saucepan, heat 1/4 cup of the maple syrup and the 2 tablespoons of coconut oil over low. Cook, stirring, until the oil melts. In a large bowl, combine oats, nuts, and pinch of salt. Drizzle maple mixture over oat mixture and stir to combine. Spread mixture evenly on a large rimmed baking sheet. Bake until golden brown, about 10 minutes. Place the oats in large bowl, add dried fruit and mix well. 

Lightly butter an 8-inch square baking dish. 

In saucepan, combine remaining 1/2 cup of maple syrup, almond butter, and honey over medium heat. Cook, stirring occasionally, until mixture comes to a boil. Drizzle over oat mixture and stir until combined; transfer  mixture to buttered baking dish. With a spatula, firmly press granola into dish. Refrigerate until firm, about 1 hour, then cut into bars or squares.


What are your plans for Thanksgiving?

Since I'll be visiting family next week, I am not sure I will have time to post. My daughter is turning 2 on Thanksgiving day, so when we return I'll be focused on celebrating this major milestone with her. Happy cooking, and a very Happy Thanksgiving to you all!