Showing posts with label dinner. Show all posts

Wednesday, October 28, 2015

Popcorn Balls with Peanut butter and Marshmallows

Popcorn Balls with Peanut butter and Marshmallows
Now that Page is in school--two schools if we're being technical--there are always opportunities for me to cook, or prepare treats for her classes.  This week has been particularly hectic because both schools are doing fundraising drives, and if you're a parent then you know the schools require a lot of participation from parents in the form of raising money and volunteering to bring food and elbow grease.  Luckily for me none of the kids in Page's class have food allergies, so I decided to make these popcorn balls.  Popcorn balls have always been one of my favorite Halloween treats.  They contain popcorn and marshmallows, really what's not to love? These popcorn balls also have a yummy touch of peanut butter, you can omit it, or sub with sun butter or almond butter if you have a little one with allergies. If not--live a little--tis the season! You can make your own marshmallows here's how, or you can buy a store brand.  I got a gluten free version from Whole Foods.
Pin It!
Pin It!


Makes 12 medium popcorn balls
Here's what you need:
Ingredients
6 cups of organic Non-GMO popcorn (equal to 1/4 cup of unpopped popcorn)
3 cups of marshmallows
2 tablespoons of butter
1/2 teaspoon of sea salt
1 tablespoon of organic peanut butter
Directions: Pop 1/4 cup of popcorn kernels then set aside in a large bowl.
To a sauce pan add the butter,
Processed with VSCOcam with c3 preset
let it melt then add the peanut butter, marshmallows,
Stir until melted,
Processed with VSCOcam with c3 preset
Working quickly pour the marshmallow mixture over the popcorn.
With a spatula work quickly to coat the popcorn in the marshmallow mixture.  Once all the popcorn has been coated, work quickly to form the popcorn into balls.
The mixture will still be quite warm so be careful and try not to burn your hands.  Once all the balls have been formed serve and enjoy!
Processed with VSCOcam with c3 preset
If you like this you'll probably love my Caramel popcorn with Almonds and coconut recipe, it's crunchy and oh so delicious!

Wednesday, October 14, 2015

Peruvian Chicken

Processed with VSCOcam with s3 preset

I love California, as a matter of fact I'd be hard pressed to name a state within this union that I'd consider leaving California for.  One of the many great things about living here, besides the diversity here, is the weather.  On a great day, the temperature ranges between 78F and 82F.  Since we live by the beach, there is seldom a day without a cool ocean breeze.  Lately however, the temperatures have been 10-20F degrees above normal, and for the last two weeks temps have settled in around 89-98F---HOT!!!!!!  So hot that the last thing I want to do is to turn on the stove.  So we've adapted, I've been marinating meat in the morning for my husband to grill in the evening when things start to cool down a bit.  This marinade is super simple, and if you've ever had grilled Peruvian chicken you know how yummy and it can be.  The vinegar in this really gives this chicken a yummy tang and kick.  I've tried this with Rice vinegar and white wine, both are yummy, but plain white distilled vinegar is just as yummy.

Pin It!
Pin It!


Here's what you need:
Ingredients
1 lb of boneless skinless organic chicken thighs
1 tablespoon cumin powder
1 tablespoon of smoked paprika
3 cloves of garlic grated
1 tablespoon of white wine vinegar--can sub with white vinegar or rice vinegar

Wednesday, October 7, 2015

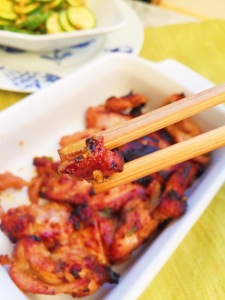
Korean Barbecue Chicken

Korean Barbecue Chicken

I love Korean barbecue, what's not to love?  Grilled meat, pickled and fermented veggies...mmmh it's a veritable umami bomb on a plate.  The fermented veggies alone are enough to get me into the door of a Korean restaurant.  I love banchan savory sprouts, kimchi, cucumber kimchi, and dashi radish make the heaviness of the barbecued meats lighter.  I remember my first experience eating Korean food.  The week of my wedding my best friend suggested that we go to a Korean bath spa together.  She said it would be a great mini break for me to table the stress of planning a wedding and at the same time get my skin nice and polished for the wedding.  I happily agreed, we had gone to many a spa together throughout our friendship, so why not make another happy memory with my best friend before I sailed off into wedded bliss, I thought.  The day before our appointments my best friend called to say that something came up at work and she could not join me, but she insisted that I go alone because I needed to destress, so I did.  The spa was unlike any other the spa that I had ever been to. After checking in, I was led on a guided tour of the steam rooms, jade rooms, and showers.  Everyone within the walls, except for the technicians, was completely naked and Asian.  I stuck out like a sore thumb.   First of all, I wasn't at all prepared to be completely naked in front of anyone other than a technician. At all the spa's  that I had ever been to everyone wore something, be it a robe, or bathing suit, but not this spa.  I also was not prepared to leave without having had my body polish.  I had read the Yelp reviews and this place was the best!  I wanted to sparkle and shine at my wedding and the only thing standing in the way of that happening was me getting naked, so I did.  I was sitting in the sauna with three women, and they could sense my unease.  They were so kind, they chatted me up, and when I felt comfortable one of them asked me how I found out about the spa.  I told them and they laughed.  I'm guessing that the spa didn't get very many non Asian patrons, which is too bad, nakedness aside, it was a great spa. The spa lacked the more polished elegance of a Burke Williams, but what it lacked in elegance it made up for it other areas, namely the food area.  After getting my scrub, and detoxing in the sauna, I walked over to the jade rooms, and just beyond that was a bar and the scent coming from the bar was intoxicating.  The bar/restaurant had a full menu of soups with fermented and pickled veggies, JACKPOT! I grabbed a folded robe from a pedestal near the entrance into the bar--you didn't think they would make us eat naked did you?--and sat down to a deliciously healthy meal.  If only all spa's included this kind of service.  That was my first experience eating Korean food, and since then I've fallen in love with it.  This recipe is my take on chicken Korean barbecue.  I have to say that this chicken is delicious!  Better than the chicken that I've had at most restaurants that I've been to.  This recipe requires Gochujang--a spicy fermented chili paste. You may need to venture into an Asian market for the Gochujang.  I purchased a jar at my local Whole Foods, they had several varieties of it, I chose a garlic Gochujang.

Here's what you need:
Ingredients:
1lb of boneless skinless organic chicken thighs, cut each thigh into 3 or 4 pieces
1.5 tablespoons of Gochujang
2 teaspoons of sugar--can sub with maple sugar or syrup
1 teaspoon of garlic grated
3 green onions chopped finely both whites and green parts
1 teaspoon of grated ginger
2 teaspoons of sesame oil
1 teaspoon of olive or grapeseed oil
2 tablespoons of soy sauce
sea salt to taste
Directions: Season the chicken with sea salt and set aside.
To a large mixing bowl or medium size bake pan add the remaining ingredients,
combine and mix well,
then toss in the chicken, tossing to coat the chicken completely in the marinade.
Cover with foil and place in the refrigerator for at least an hour.
Remove the chicken from the refrigerator 30 minutes before cooking.  Grill the chicken on a hot grill, 5-7 minutes on each side, serve and enjoy!


Tuesday, June 2, 2015

DIY Onion Soup Mix--Copy Cat Lipton's Onion Soup Mix

DIY Onion soup mix
DIY Onion soup mix
There are three seasonings that I can rely on my mom to have in her cupboards at all times: Lawry's seasoning salt, Lemon pepper, and Lipton's Onion Soup Mix.  In fact while writing this, I was tempted to call her, and have her take a picture of what is inside her cupboards, just so that you guys could see, but she's not that technologically savvy.  She barely knows how to get the pictures that I send her of Page through text.  When I was growing up my mom would rent  4-5  movies and make a bunch of snacks for us watch over the course of the weekend.  One of those snacks was a sour cream and onion dip.  She'd take a container of sour cream and mix in a package of the Lipton Onion Soup mix--simple but delicious.  We'd happily nosh on potato chips, celery, and carrot sticks dipped in the onion dip while we watched the latest movie release from Blockbuster video--yes I just dated myself!  Oh the memories!  I haven't had that dip in years!  I'd say a good 10-12 years, maybe longer.  It's not something my mom makes any more.  I wanted to make it for me and my hubby, but I didn't want to buy the Lipton's seasoning. I had an idea of what was in the seasoning--or at least I thought I did-- dried minced onion, onion powder, dried green onion--but to be sure I called my mom and asked her what was on the ingredient list.  Sure enough she had a box in her cupboard and  the ingredient list she read to me was anything but simple. Besides the MSG, onion powder, and cornstarch, there were a list of ingredients that had  nothing to do with onions. So I set out to do what I do best and made my own--without all the added preservatives and coloring.  I used the organic onion powder that I made myself, and added minced onion and a few herbs.  A perfect match! Tastes just like I remember it! Delicious!!
Pin It!
Pin It!


Makes the equivalent of 1 package of Lipton Onion soup mix
Ingredients:
4 Tablespoons of organic dried minced onion flakes
3 teaspoons of organic onion powder
1 teaspoon of organic dried chives
1 teaspoon of sea salt
1/4 teaspoon of celery salt
Directions: Mix all ingredients together in a small bowl, if you don't plan on using this right away, transfer it to an air tight container for later use.
image
 
image
 
image

Miso Butter--How to Make Miso Butter

How to Make Miso Butter
Butter is delicious all on its own, I love adding it to sauces, slathering it on piping hot corn on the cob, or a simple piece of toast. There is not much that butter doesn't improve.  However, miso butter is the younger, prettier, and more sophisticated sibling of butter. It's everything butter is, but better! I was introduced to miso butter by David Chang after watching a chef series he did.  Frankly, I don't know why I never tried making miso butter before.  I have had it several times at restaurants, and was always fascinated whenever chefs mentioned using it. I guess it just never occurred to me to try to make it at home--until it did--and now I can't live without it.  Most chefs recommend using a 2 to 1, or 3 to 1 ratio of butter to miso.  I found my sweet spot is larger on the butter side, so my ratio is more of a 4 to 1. Tomorrow I am going to share one of my absolute favorite ways to use miso butter, until then here is how you make it.
Pin It!
Pin It!


Prep time: 5 minutes
 
Ingredients:
2 tablespoons of white organic miso
7  tablespoons of grass fed butter--cut into cubes--it makes mixing easier
Directions: To a medium size bowl add the butter,
image
Then the miso.
image
Using  the back of a large spoon, mix and mash together the butter and miso paste until well combined.
image
 
image
You'll know the butter is fully mixed when you no longer see streaks of brown or yellow.
image
Once the butter and miso have been well combined, transfer to an air tight container and refrigerate for later use.
image
image
This butter is amazing on almost everything, from steaks to veggies and fish!  See you tomorrow;-)
If you like this recipe try my recipe for How to make Butter or How to brown butter

Wednesday, April 22, 2015

Persian Spiced Salmon Kabobs

Persian Spiced Salmon Kabob's
 
I love a good kabob and lately I've been craving them.  Salmon is such a hearty fish, and there are many great ways to prepare salmon, but when you want to switch things up a bit--grilled salmon is the way to go.  I made a paste to adorn this salmon, and it's rich in Mediterranean flavors.  I used sumac, which can be found in any middle eastern store, or in your local Trader Joe's--it's where I got mine.  Sumac is tart,  sour and is often used in place of lemon in middle eastern recipes.   If you can't find sumac, then by all means feel free to substitute with the zest of a lemon.  The flavor is this dish is fantastic.  The fresh thyme was amazing! I felt like I was eating at one of my favorite Persian restaurants.  Page really loved it, and my husband could not stop with the compliments.
Pin It!
Pin It!


Prep time: 5 minutes
cook time: 7 minutes
Total time: 12 minutes
 
Ingredients:
1lb of salmon-- dried with paper towels, de-skinned, and cubed into 1 inch pieces
1 teaspoon of sumac powder-- can substitute with lemon zest
1/2 teaspoon of garlic powder
1/2 teaspoon of cumin
1 teaspoon of fresh thyme-stems removed
1 teaspoon of olive oil--or oil of your choice
sea salt to taste
Directions: To a small bowl add the garlic powder, cumin powder, fresh thyme and oil, mix well and set aside.
image
Rub the spice mixture on the salmon,
image
 
then add the salmon to skewers,
image
 
Grill the salmon for 3-4 minutes on each side, remove from grill, serve and enjoy!
image
 

Wednesday, April 15, 2015

Pineapple Rings--How to make dehydrated Pineapple Rings

Dehydrated Pineapple Rings
One of my go to snacks is dehydrated fruit.  I'm a particular fan of pineapple rings.  But, if you've ever purchased organic dehydrated pineapple rings, then you probably know that pineapple rings are a snack that can be out right expensive! I mean outlandishly expensive! On top of the expense, it's pretty hard to find pineapple rings that haven't been soaked in baths of sugar.  I'm not a fan of adding sugar to dehydrated fruit.  It's sort of an oxymoron to me that sugar is added to dehydrated fruit at all, because if you know anything about dehydration--then you know that the sugar in fruits concentrate when dehydrated, so there really isn't a need to add sugar--unless you're dehydrating something really tart like cranberries then I could see the purpose of adding sugar. Last week I purchased a pineapple, I fully intended to eat it fresh. However,when I cut, and tasted it-- it was pretty tasteless. Disappointing for sure. The pineapple clearly needed to ferment more.  Rather than chuck it, I sliced it and put it in the dehydrator and made pineapple rings. The resulting pineapple rings were not only flavorful, but they were sweet--everything you want would want in a fresh bite of pineapple--minus the juice of course.  The pineapple rings lasted all of 2 minutes, my sister in-law, my niece and Page, gobbled them right up--I'm pretty sure they would've passed on the fresh slices.
Pin It!
 
 
Prep time: 10 minutes
Cook time 6-8 hrs 10-12hr for thicker slices
Ingredients:
2 whole fair trade organic pineapple
Directions: Remove the stem from the pineapple, then slice off the top and bottom.  Slice off the skin, making sure to remove all the eyelets.
image
Now slice the pineapple thinly.
image
Keep in mind that the thicker you slice it, the longer it will take to dry.  If it's too thin your pineapple rings will turn out crisp, if they are a bit thicker, they'll be more leathery, so it' just a matter of what you're seeking in consistency.  After slicing, cut out the center core by carving a circular cut in the middle of the pineapple.
image
Remove the core and discard it.
image
Place the pineapple rings on your dehydrator sheet,
image
Set the dehydrator to 135F.  If you're doing this in the oven, set the oven to 150F or the lowest possible setting.  Dehydrate for 6-8 hours, 10-12hrs if you cut thicker slices.
image
Once dry let cool, then enjoy!
image
Page could not wait for me to take a picture, she loves these so much!
image
image
if you like this recipe, try the recipe for my pineapple fruit roll-ups!