Showing posts with label lowcarb. Show all posts

Wednesday, April 22, 2015

How to Brown Butter

How to Brown Butter
How to Brown Butter
It has been said that butter makes everything better.  In my opinion  brown butter is butter in it's best form.  The nutty, butterscotch notes butter has once it has been browned are heavenly!  I love to use brown butter in everything from sauces to baked goods.  In fact, the other day, Page and I were baking with browned butter, and even she--in all of her 3-year-old astuteness--could not stop saying how good the brown butter smelled.  The aroma had us both in a euphoric trance--I'm not exaggerating--we were both giddy over the smell--and the cookies...the cookies were AMAZING!!!  I'll share that post another day.  You can make as much or as little of this as you'd like.  Once the butter has browned you can place in the refrigerator to use for later.  A good brown butter sauce can liven up everything --even veggies.

Pin It!
Pin It!
Prep time: none
Cook time: 5-7 minutes
Ingredients:
2 sticks of butter
Directions: Place the butter in a stainless steel or clear bottom sauce pan
image
and melt over medium low heat.
image
Once the butter has completely melted, things move along pretty quickly, the solids have already begun to separate for me and it's been about two minutes:
image
At about 5 minutes in the butter will start to bubble and and splatter, stir, stir, and stir some more:
image
Now is the time to watch the butter like a hawk, because then this happens:
image
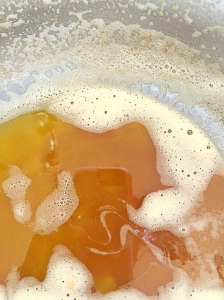
Foam, a lot of foam, which makes it hard to see if the butter has browned underneath, so move the foam to the side with a spoon to see if the butter has browned. image
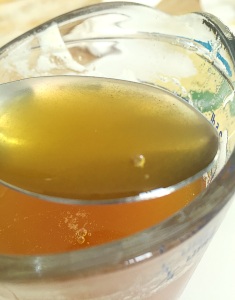
You'll be able to tell the butter has browned because you'll start to see brown bits of milk solids on the spoon and in the pan.
image
The butter will also start to smell AMAZING!! It takes on a sweet, nutty almost butterscotch aroma.  I was happy with the color at this point, but you could go a little longer--just be careful not to go too much longer, because the butter continues to brown even after you remove it from the heat. After you're happy with the color,  remove it from heat and transfer to a heatproof container.  Make sure to transfer all of the butter milk solids--the milk solids are the best part.  They don't look appetizing but they are.  I added them after I took this picture, just so you guys could see what they look like.:
image
Continue to stir for a  few minutes to help cool it down.
image
Use it right away or allow the brown butter to cool to room temperature before transferring to an air tight container and then the refrigerator for later use.

Wednesday, April 15, 2015

Pineapple Rings--How to make dehydrated Pineapple Rings

Dehydrated Pineapple Rings
One of my go to snacks is dehydrated fruit.  I'm a particular fan of pineapple rings.  But, if you've ever purchased organic dehydrated pineapple rings, then you probably know that pineapple rings are a snack that can be out right expensive! I mean outlandishly expensive! On top of the expense, it's pretty hard to find pineapple rings that haven't been soaked in baths of sugar.  I'm not a fan of adding sugar to dehydrated fruit.  It's sort of an oxymoron to me that sugar is added to dehydrated fruit at all, because if you know anything about dehydration--then you know that the sugar in fruits concentrate when dehydrated, so there really isn't a need to add sugar--unless you're dehydrating something really tart like cranberries then I could see the purpose of adding sugar. Last week I purchased a pineapple, I fully intended to eat it fresh. However,when I cut, and tasted it-- it was pretty tasteless. Disappointing for sure. The pineapple clearly needed to ferment more.  Rather than chuck it, I sliced it and put it in the dehydrator and made pineapple rings. The resulting pineapple rings were not only flavorful, but they were sweet--everything you want would want in a fresh bite of pineapple--minus the juice of course.  The pineapple rings lasted all of 2 minutes, my sister in-law, my niece and Page, gobbled them right up--I'm pretty sure they would've passed on the fresh slices.
Pin It!
 
 
Prep time: 10 minutes
Cook time 6-8 hrs 10-12hr for thicker slices
Ingredients:
2 whole fair trade organic pineapple
Directions: Remove the stem from the pineapple, then slice off the top and bottom.  Slice off the skin, making sure to remove all the eyelets.
image
Now slice the pineapple thinly.
image
Keep in mind that the thicker you slice it, the longer it will take to dry.  If it's too thin your pineapple rings will turn out crisp, if they are a bit thicker, they'll be more leathery, so it' just a matter of what you're seeking in consistency.  After slicing, cut out the center core by carving a circular cut in the middle of the pineapple.
image
Remove the core and discard it.
image
Place the pineapple rings on your dehydrator sheet,
image
Set the dehydrator to 135F.  If you're doing this in the oven, set the oven to 150F or the lowest possible setting.  Dehydrate for 6-8 hours, 10-12hrs if you cut thicker slices.
image
Once dry let cool, then enjoy!
image
Page could not wait for me to take a picture, she loves these so much!
image
image
if you like this recipe, try the recipe for my pineapple fruit roll-ups!

Tuesday, August 26, 2014

Ground Chicken and Cabbage Curry

Ground Chicken and Cabbage Curry
Do you ever pull out something for dinner and then have no clue what you're going to make with it? I do...all the time! Most of the time it works out, but working out on some days can be relative. Success for me is getting a nutritious meal on the table on most days. This Chicken and Cabbage curry recipe  almost didn't come together. I pulled out the ground chicken, but all I had to go with it was the cabbage. I didn't have any fresh onion, no fresh garlic, none of the ingredients one needs to make something taste good. My fridge was empty because I had put off grocery shopping, and now I had to pay the price. I turned to my cupboards for help. I had a bevy of ground dried spices, curry, onion powder, ground ginger and garlic.  From those dried spices, this meal was born, and let me tell you what a delicious meal it was! It is one of my husbands favorite meals. I've made this with fresh onion and garlic, but the dried spices give this much better flavor.
Pin It!
Pin It!


Prep time: 5 minutes
Cook time: 20 minutes
total time: 25 minutes

Ingredients
1 lb of ground chicken
1 tablespoon of onion powder
1 teaspoon of garlic powder
2 tablespoons of curry powder
1 teaspoon of ground ginger powder
2-3 tablespoons of  olive oil, or ghee
1 small head of cabbage, chopped roughly
4 tablespoons of freshly chopped cilantro

Directions:
Heat olive oil in a pan add dried spices and  heat for 20 seconds or just until spices become fragrant. Add in ground meat and brown. Once meat has cooked, add in the cabbage, and cook for about 5-7 minutes or until cabbage wilts a bit. 

Remove from heat, top with cilantro and serve as is, or over a bowl of brown basmati rice and enjoy!

Tuesday, July 15, 2014

Chicken Enchilada's with Salsa Verde

Easy Chicken Enchiladas with Salsa Verde Sauce


Chicken enchilada's are so easy to make. You can throw almost anything in enchiladas and not mess them up and they're done in less than 30 minutes. A friend gave me some homemade salsa verde, and the moment I tasted it, I knew that it would make these enchiladas sing!  For the chicken in these I just threw a chopped onion and 1 pound of chicken thighs in my pressure cooker with enough water to cover, and cooked the chicken for 20 minutes--easy peasy.  But if you have leftover chicken you can use that.

Prep time: 10 minutes
Cook time: 15-20 minutes
Total time: 30 minutes

Ingredients:
1 lb of cooked chicken (shredded)
2 cups of cheddar cheese (grated)
2 cups of salsa verde
1/2 cup of black olives, sliced
10-12 corn tortilla's

Directions: Pre-heat the oven to 375F. Lightly greese a 9x11 baking dish, then line the bottom of  the baking dish with corn tortillas.  Top the tortillas with the shredded chicken, top the chicken with salsa verde, top the salsa verde with cheese, and  finally add a layer of  black olives.  Cover the olives with one more layer of corn tortillas, add a  layer of salsa verde, a layer of cheese and the last of the olives.


 Place in the oven for 15-20 minutes, or until the cheese has melted, remove from the oven, serve and enjoy!


Sunday, February 23, 2014

Roast Chicken with Cilantro Pesto

Roast Chicken With Cilantro Pesto

I make roast chicken a lot for my family. Mainly because it's easy, and I know everyone will enjoy it. However, because I make it so often, I am always trying to come up with ways to make it differently, ways in which I can add flavor, this pesto does exactly that. It adds a ton of flavor, but requires minimal extra work. You throw all the ingredients in the blender or a food processor, push a button and it's done! Leftover, pesto, if you have any, can be spread on bread as the condiment to leftover chicken salad sandwiches...talk about yum! If you don't want to roast an entire chicken, you can scale this down and use just 2 chicken breasts, it doesn't matter. I find that buying a whole organic chicken is often less expensive than buying just 2 organic chicken breasts. So I always prefer to save money and buy the whole chicken. I reinvent the leftover chicken into tacos, salad, soup or tostadas.


Prep time: 10 minutes
Cook time: 45 minutes
Total time: 55 minutes

Ingredients:
1 whole Organic Nongmo Air-chilled Chicken
2 cloves of garlic
2-3 Tablespoons of Olive oil
1/2 teaspoon of thyme
Sea salt and black pepper to taste

Ingredients for Cilantro Pesto:
2 cups of cilantro
1/2 cup of olive oil
1/2 cup of freshly grated Parmesan cheese
1/4 cup of  toasted hazelnuts
Sea salt and black pepper to taste

Directions: Pre-heat the oven to 425F. Season the chicken generously with sea salt and black pepper, then rub it with the garlic and oil. Line a baking dish with foil, place the chicken on it and place it in the oven and cook for 45 minutes or until the chicken is cooked through. Meanwhile, place all the ingredients for the pesto in a blender or processor, and blend until smooth.  Serve the pesto however you'd like, I smear it on the chicken, with an additional spoonful or two, so that I can dip as I go. It's so delicious!!!! If you haven't read my blog on  How to roast Chicken, Steps to making the perfect roast chicken  now would be a great time. My recipe for  Roast Chicken with Lemon and Garlic works the pesto as well.