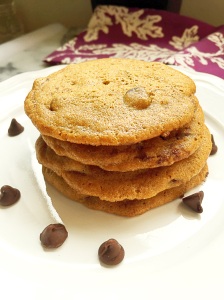
- Brown Butter Chocolate Chip Cookies
Before I had my own child, I spent countless hours in the kitchen with my nieces and nephews baking cookies. It was a tradition actually. A tradition that my now 22-year-old niece looks back on fondly. Great considering the fact that I do not consider myself a baker. This particular recipe is a chocolate chip recipe from Serious eats, but with my spin on it. By spin, I mean I used the listed ingredients, mostly--and a little extra chocolate, but I did not follow the directions as written. I sort of did things my way. If you want to make these cookies exactly as Kenji over at Serious eats intended, then by all means follow
this recipe. In either case, this recipe is tried and true. The brown butter in this recipe lends a nice toffee flavor to these cookies. I let the dough rest before cooking these. My intent was to let it rest over night, but the dough smelled so good that Page insisted that we bake a few right away, so we did, after it rested for about 8 hours. To be honest there was not really a noticeable difference between the cookies we baked early and the ones that were baked the next day. Good cookies are just good cookies. But that could have been a result of me not following the directions word for word. But that aside, these cookies were amazing!!! If you were lucky enough to have one of these at a bake sale--you'd be a lucky duck indeed!

- Pin It!
Time: 30 minutes
Ingredients
10 ounces of all purpose flour (about 2 cups)
8 ounces of cooled brown butter (2 sticks) see directions for browning butter
here
3/4 teaspoon baking soda
5 ounces of granulated sugar or 3/4 cup
5 ounces of tightly packed brown sugar or 1/2 cup plus 2 tablespoons (go to my Instagram account to see how to make your own)
10 ounces of chocolate chips
2 teaspoons of kosher salt--I used Pink Sea Salt
2 eggs
2 teaspoons of vanilla extract
Directions: Add flour, salt and baking powder to a bowl, mix and set aside. Add cooled brown butter and sugars to a bowl with the whisk attachment. On medium speed, cream together, for about 5 minutes. Kenji's recipe calls for using brown butter that has not fully solidified, but I am a busy woman, I put my brown butter in the refrigerator, and came back for it 3 hours later, so I decided to cream it with the sugars.
After butter and sugar mixture has creamed, change to the paddle attachment and add in the eggs and vanilla mix on medium speed until the mixture comes together.
Add in the flour mixture and mix on low speed until dough is just barely combined , about 15 seconds.
There should still be some dry flour remaining.
Turn off mixer, add in chocolate chips, using a silicon spatula, fold the chocolate chips into the dough,
Transfer to an air tight container and refrigerate. I rolled the dough out onto parchment and then sealed it in a Ziploc bag. Then separated it into 3 equal sized cookie logsso that I could freeze them for later--that didn't really happen--I gave one roll away, and we ate the rest:
Allow the dough to rest overnight, or as long as you can--up to 3 days in the refrigerator, then cut or scoop dough out into tablespoon sized portions on to a silpat or parchment lined cookie sheet.
Bake on 325F for 13-16 minutes. The cookies should be brown on the edges but soft in the middle. Remove from oven, transfer to a wire rack to cool, then enjoy!