Showing posts with label snack. Show all posts

Wednesday, May 6, 2015

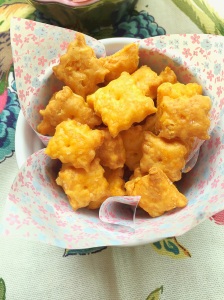
D.I.Y. Cheese Crackers--How to make Cheese It Crackers

DIY Cheese Cracker's--DIY Cheese it's
My mom is a lover of all things snack related, so for Mother's Day I want to give her what she enjoys most. I had been planning on making cheese cracker's for Page, she was given gold fish crackers as a snack at school, and came home and immediately asked me to buy them.  Not really going to happen.  So since my mom and Page share a love of great snacks, I thought I'd make these cheese crackers for them. These cracker's are what AWESOME aspires to be! They're better than great! And they're 1000 times tastier than store bought cheeze it's.  The recipe I used comes from America's Test kitchen, so if you want the recipe in it's original form click here.  I used less salt than the original recipe calls for.  Cheese already has a lot of salt, so adding too much is overkill. Do pick a great quality cheese for these, because quality matters for this particular recipe--good cheese=great cheese crackers. The recipe calls for the use of Annatto seeds, I found them quite easily in the spice section of Whole Foods.  If you can't find them, omit them from the recipe--your crackers will be white, instead of orange--not a big deal, they'll still taste beyond amazing!!!
 
Ingredients:
6 ounces of organic sharp cheddar cheese, finely grated
4 tablespoons of butter (2 ounces)
1 teaspoon of sea salt
1/2 cup + 2 tablespoons of all purpose flour
2 tablespoons of cornstarch
1 tablespoon of Annatto seeds, coarsely ground (optional)
2 tablespoons of boiling water
Directions: To a small bowl add add the coarsely ground annatto seeds and the boiling water.
image
Allow the seeds to steep in the boiling water for 5 minutes, then strain and allow to cool to room temperature.
image
 
Meanwhile, add the butter, 1 teaspoon of salt, and cheese to a stand mixer with the paddle attachment,
image
mix on medium speed until cheese and butter are creamed and well combined--about 30 seconds.
image
Add in the flour and cornstarch and mix until combined--about 1 minute.
image
Add in the Annatto seed water,
image
then mix until dough clumps together or forms a ball--about 15 seconds.
image
Transfer dough to a  lightly floured counter, flatten to a disc, wrap and refrigerate for 30 minutes.
image
image
When ready to cook, pre-heat oven to 375F.  Line two bake sheets with parchment paper. Remove the dough from the refrigerator, and working on a floured counter, roll out the dough to 1/16 inch thickness--or as thin as you can get it without falling apart when you move it.
image
Cut the dough into 1 inch squares using a pizza or ravioli cutter or use small cookie cutters to cut out shapes.
image
Use a skewer to poke holes in the center of the crackers,
image
image
Transfer to the parchment lined bake sheets, place in the oven and bake until light and golden--about 18 minutes.
image
Remove from oven, allow to cool completely, then enjoy.
image
These can be stored in an airtight container for up to 3 days.
 
image
 

Wednesday, June 11, 2014

Strawberry Apple Fruit Roll-Ups


Strawberry-Apple Fruit Roll-ups

Now that summer has arrived we are constantly on the go.  Which means that we spend much more time in the car.  My daughter does surprisingly well on car rides, however, she does better if I am armed with plenty of games to fill her time, and of course snacks don't hurt.  She is extremely fond of apple strings--apples that I run through my vegetable spiralizer on the spaghetti attachment, however they oxidize so quickly after making them, I like to save those for home snacks.  Enter fruit roll-ups, she loves them and they are extremely travel friendly.  If you follow this blog, then you know I have several recipes for fruit rolls ups my tropical punch fruit roll-ups are my absolute favorite, but the pineapple, or strawberry fruit roll ups are equally as delicious!

Ingredients:

10 ounces of strawberries stems removed
2 medium sized apples, cores removed

Directions: Place the strawberries and apples in a blender and blend until smooth.  


Pour the mixture out onto a parchment lined sheet and smooth into a thin layer.


Place in a dehydrator on 134 for 4-6 hours, or in a oven on the lowest setting for 4-6 hours.
Fruit roll-ups are done when you can peel them off of the parchment without them sticking.

Tuesday, October 29, 2013

Almond Milk--How to make Almond Milk

Raw Almond Milk

I have made a lot of nut milks, in my life, so I would be untrue to you if I didn't share at least one of  my recipes for them with you. We don't drink cows milk in my house, so nut milks have been a great alternative for us. I have tried my hand at making almost every milk alternative out there, from soy milk to hemp milk, I've tried it all. The truth is that once you make one, you can just substitute the seeds or the nuts, and you can make them all. The only exception to that rule is soy milk. For soy milk things get a bit more complicated, because it has to be heated to a certain temperature, for it to be safe for consumption. Luckily for us all someone invented the soy milk maker. I have one and I love it! The one I have also allows me to make raw nut milks. Personally I prefer to use it only for making soy milk. My blender does a better job at making the nut milks. For this recipe, you'll need a either a nut milk bag, which you can purchase here,or at Whole Foods, or cheese cloth. I've used both, and they both work well, but it becomes a bit expensive if you make nut milks a lot, to keep buying cheese cloth. The nut milk bags are reusable and more user friendly for this purpose.

Ingredients:
2 cups of raw almonds, soaked in a bowl of water overnight, then drained and rinsed
4 cups of water
1/2 teaspoon of vanilla extract (optional)
sweetener of choice (maple syrup, agave, 4 dates) (optional) to your taste.

Equipment:
1 cheese cloth folded  into 4 layers
Blender, or food processor

Directions:
Add raw almonds to a bowl and add enough water to cover them,  then refrigerate overnight.


 Drain and rinse the soaked Almonds and add them to the blender, along with the water, vanilla extract and sweetener if you're using them.

Cover the blender and blend on high for 2-4 minutes, depending on how high powered your blender is it could take more or less time. Blend until a milk forms and the almonds resemble a fine grain paste.


 Place your nut milk bag, or  folded cheese cloth over a large bowl, and pour the blended mixture into the bag or cheese cloth to strain it, squeezing until all the liquid is out and what is left behind is fairly dry almond pulp.


Place the milk in an air tight container like a mason jar, and refrigerate for up to 5 days. You can add cocoa powder and have chocolate almond milk, or leave it plain. Whatever you choose to do, this milk is delicious. You can use the left over almond pulp too! If you spread it out on a cookie sheet and place it in the oven on 175- 200F to dry it out, what you get is homemade almond meal. You can bake muffins, make pancakes, and a number of other delicious baked goods with it.

What is your favorite milk alternative? Have you ever made it at home?

Follow and like me on Facebook: www.facebook.com/lazygirldinners