
Showing posts with label healthy snack recipes. Show all posts

Thursday, May 21, 2015

D.I.Y. Mango Fruit Roll-ups-How To Make Dehydrated Mango Treats

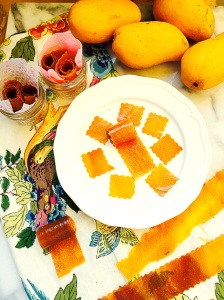
DIY Mango Fruit Roll-Ups
 
My friends are a kind and generous bunch! They are constantly giving me gifts--beyond the gift of friendship!  My friends supply me with a constant supply of treats.  I went out to lunch with two of my best girls friends the other day, and came home with a gift box of mango's! Sweet, delicious, and ultra creamy, I did not want them to go to waste, before we got the chance to eat them all.    One of my favorite dried fruits to eat, besides pineapple rings, is dried mango.  But it's so hard to find mango's that have not been soaked in sugar.  The best thing about making these yourself, is that you don't have to worry about that.  Page loved these treats even more than I did, I cut them into bite size pieces with a pastry cutter after they were done.  You could also use a pizza cutter.
 
Pin It!
Pin It!


Ingredients:
6 mango's, skin and pits removed
 
Directions: Place mango in blender:
image
Blend until smooth.
image
 
Pour out onto parchment paper and smooth out evenly.
image
 
Place in oven, or dehydrator on 135 degrees Fahrenheit, or the lowest setting on your oven, for 6-8 hours. 
image
Remove from parchment paper, roll, and enjoy!
image
 
image

Wednesday, May 6, 2015

D.I.Y. Cheese Crackers--How to make Cheese It Crackers

DIY Cheese Cracker's--DIY Cheese it's
My mom is a lover of all things snack related, so for Mother's Day I want to give her what she enjoys most. I had been planning on making cheese cracker's for Page, she was given gold fish crackers as a snack at school, and came home and immediately asked me to buy them.  Not really going to happen.  So since my mom and Page share a love of great snacks, I thought I'd make these cheese crackers for them. These cracker's are what AWESOME aspires to be! They're better than great! And they're 1000 times tastier than store bought cheeze it's.  The recipe I used comes from America's Test kitchen, so if you want the recipe in it's original form click here.  I used less salt than the original recipe calls for.  Cheese already has a lot of salt, so adding too much is overkill. Do pick a great quality cheese for these, because quality matters for this particular recipe--good cheese=great cheese crackers. The recipe calls for the use of Annatto seeds, I found them quite easily in the spice section of Whole Foods.  If you can't find them, omit them from the recipe--your crackers will be white, instead of orange--not a big deal, they'll still taste beyond amazing!!!
 
Ingredients:
6 ounces of organic sharp cheddar cheese, finely grated
4 tablespoons of butter (2 ounces)
1 teaspoon of sea salt
1/2 cup + 2 tablespoons of all purpose flour
2 tablespoons of cornstarch
1 tablespoon of Annatto seeds, coarsely ground (optional)
2 tablespoons of boiling water
Directions: To a small bowl add add the coarsely ground annatto seeds and the boiling water.
image
Allow the seeds to steep in the boiling water for 5 minutes, then strain and allow to cool to room temperature.
image
 
Meanwhile, add the butter, 1 teaspoon of salt, and cheese to a stand mixer with the paddle attachment,
image
mix on medium speed until cheese and butter are creamed and well combined--about 30 seconds.
image
Add in the flour and cornstarch and mix until combined--about 1 minute.
image
Add in the Annatto seed water,
image
then mix until dough clumps together or forms a ball--about 15 seconds.
image
Transfer dough to a  lightly floured counter, flatten to a disc, wrap and refrigerate for 30 minutes.
image
image
When ready to cook, pre-heat oven to 375F.  Line two bake sheets with parchment paper. Remove the dough from the refrigerator, and working on a floured counter, roll out the dough to 1/16 inch thickness--or as thin as you can get it without falling apart when you move it.
image
Cut the dough into 1 inch squares using a pizza or ravioli cutter or use small cookie cutters to cut out shapes.
image
Use a skewer to poke holes in the center of the crackers,
image
image
Transfer to the parchment lined bake sheets, place in the oven and bake until light and golden--about 18 minutes.
image
Remove from oven, allow to cool completely, then enjoy.
image
These can be stored in an airtight container for up to 3 days.
 
image
 

Wednesday, April 15, 2015

Pineapple Rings--How to make dehydrated Pineapple Rings

Dehydrated Pineapple Rings
One of my go to snacks is dehydrated fruit.  I'm a particular fan of pineapple rings.  But, if you've ever purchased organic dehydrated pineapple rings, then you probably know that pineapple rings are a snack that can be out right expensive! I mean outlandishly expensive! On top of the expense, it's pretty hard to find pineapple rings that haven't been soaked in baths of sugar.  I'm not a fan of adding sugar to dehydrated fruit.  It's sort of an oxymoron to me that sugar is added to dehydrated fruit at all, because if you know anything about dehydration--then you know that the sugar in fruits concentrate when dehydrated, so there really isn't a need to add sugar--unless you're dehydrating something really tart like cranberries then I could see the purpose of adding sugar. Last week I purchased a pineapple, I fully intended to eat it fresh. However,when I cut, and tasted it-- it was pretty tasteless. Disappointing for sure. The pineapple clearly needed to ferment more.  Rather than chuck it, I sliced it and put it in the dehydrator and made pineapple rings. The resulting pineapple rings were not only flavorful, but they were sweet--everything you want would want in a fresh bite of pineapple--minus the juice of course.  The pineapple rings lasted all of 2 minutes, my sister in-law, my niece and Page, gobbled them right up--I'm pretty sure they would've passed on the fresh slices.
Pin It!
 
 
Prep time: 10 minutes
Cook time 6-8 hrs 10-12hr for thicker slices
Ingredients:
2 whole fair trade organic pineapple
Directions: Remove the stem from the pineapple, then slice off the top and bottom.  Slice off the skin, making sure to remove all the eyelets.
image
Now slice the pineapple thinly.
image
Keep in mind that the thicker you slice it, the longer it will take to dry.  If it's too thin your pineapple rings will turn out crisp, if they are a bit thicker, they'll be more leathery, so it' just a matter of what you're seeking in consistency.  After slicing, cut out the center core by carving a circular cut in the middle of the pineapple.
image
Remove the core and discard it.
image
Place the pineapple rings on your dehydrator sheet,
image
Set the dehydrator to 135F.  If you're doing this in the oven, set the oven to 150F or the lowest possible setting.  Dehydrate for 6-8 hours, 10-12hrs if you cut thicker slices.
image
Once dry let cool, then enjoy!
image
Page could not wait for me to take a picture, she loves these so much!
image
image
if you like this recipe, try the recipe for my pineapple fruit roll-ups!