Wednesday, February 18, 2015

Rosemary, Garlic, & Lemon Pototoes

image
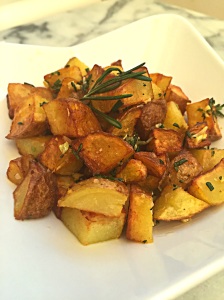
Rosemary, Garlic, and Lemon Potatoes
 
One of my husbands favorite side dishes.  He is a lover of all things potato, so I'm constantly trying to switch up the way that I cook them. The easiest way for me to do that is to switch up the herbs.  In this case fresh is best! The fresh rosemary really makes these potatoes sing! The pungent and earthy flavor of fresh rosemary paired with the lemon and garlic, make for a delicious potato dish!
Pin It!
 
 
Prep time: 5 minutes
Cook time: 10-15 minutes
Ingredients:
4 medium organic potatoes (cubed skin on)
1 Tablespoon of fresh organic rosemary finely chopped
1 teaspoon of garlic finely chopped
1/2 teaspoon of lemon powder (can sub the zest of one small lemon)
4-5 Tablespoons of grape seed oil
Sea salt to taste
Directions: Heat olive oil in a frying pan. Place cubed potatoes in,
image
Cook potatoes until they start to brown, tip, cook for 5 minutes on one side, brown and then flip to the other side to brown.  Once potatoes are brown and fork tender, add the rosemary, lemon powder, and garlic, toss for ten to twenty seconds, just until you can smell the garlic, turn the fire off.
image
Transfer to a plate season with sea salt toss and enjoy!
image
 
If you like these potatoes then you'll love my recipe for Lemon and Garlic Potatoes! You might also like these Ranch Potatoes!

Monday, February 16, 2015

Tortilla Pizza--How to Make Pizza with a Tortilla Crust


Tortilla Pizza
Tortilla Pizza
 
A friend of mine has been espousing the virtues of the Baking Steel for over a year and half now.  We don't make very many pizza's in this house, so I put it on my list of things that I want to buy in the future, but really can wait. Then I read all about the virtues of this steel plate in Modernist Cuisine, and I knew that I needed one sooner rather than later.  Aside from being a great way to make brick oven style pizza's, the baking steel works as a plancha, an anti-griddle, and a teppanyaki.  A multi-purpose gadget always excites me, so I  ordered one.  I came across a great article on Serious eats about a reversible version of the Baking Steel, and right next to it was a recipe for Extra-Crispy Bar-Style Tortilla Pizza and I knew that I had to try it. Leave it to me to buy a gadget made for making pizza only to put it aside to make a pizza in a cast iron skillet.  After making this, I don't know why I never thought to try making pizza with a tortilla as a base before.  I've used naan, pita, and a middle eastern bread to make pizza before, so you would think it would have occurred to me to try one with a tortilla.  This pizza is super-duper easy, takes less than 10 minutes from start to finish, and it's the best thin crust pizza that I've ever eaten.   For my gluten free friends, this pizza is easily adapted to become gluten free by switching out the flour tortilla, with a gluten free tortilla, Whole Food's sells a host of different varieties. You can add additional toppings to this, but I kept it simple.
Prep time: 5 minutes
Cook time: 7-10 minutes
Pin It!
 
 
Ingredients:
3 tablespoons of Organic Tomato sauce (I used the Trader Joe's brand)
1/4 cup of freshly grated parmesan cheese
1/2 cup of organic mozzarella cheese (grated)
3 fresh basil leaves sliced thinly
1 large organic flour tortilla
1/2 teaspoon coconut oil or grape seed oil
Directions: Pre-heat oven to broil.  Add the oil to the cast iron pan and bring to temperature over high heat.
image
Once the oil is hot, wipe out any excess with a paper towel--be careful not to burn yourself.
image
Add the tortilla to the pan, turn the heat down to medium-low.
image
Add the 3 tablespoons of tomato sauce,
image
spread the sauce out evenly over the tortilla, all the way out to the edges.
image
 
Add the mozzarella.
image
Then add the parmesan around the edges--you are giving your pizza a parmesean crust.
image
Add the basil:
image
Transfer the pizza to the oven,
image
 
Allow the pizza to cook for 3-4 minutes or until the cheese bubbles and browns.
image
Remove the pan from the oven.  The pizza should be nice and crisp--if it is not, place the cast iron pan over a burner, turn on the fire and allow to  cook for another 30-60 seconds until it's nice and crisp. Remove the pizza from the pan slice, serve and enjoy! This recipe is only for one pizza, so if you need more adjust accordingly.  My daughter enjoyed this so much, that she begged me to make her one for breakfast the next morning.
image
 
image
 
image
If you like this recipe you will probably like my recipe for Artisan Prosciutto Tomato and Basil Pizza.
Follow and like me on Facebook: www.facebook.com/lazygirldinners

Wednesday, February 11, 2015

How to make Onion Powder--DIY Onion Powder

DIY Onion Powder--How to make Onion Powder
Recently I was chatting with some professional chefs online one of them was talking about using dried powders like garlic and onion in a recipe that he was playing with.  He wanted to know where he could find better quality powders.  The discussion quickly went from people being helpful, to people questioning whether any chef of good standing would ever use a dried product versus a fresh product. One person in particular, said absolutely not!  Others, said of course and then went on to make a case for when dried spices are needed, and in those cases how using dry spices make the dish better.  The discussion got me thinking about how often I use dried spices, and what dry ingredients I use.  The truth is that I am one of those cooks, who relies heavily on fresh ingredients.  The produce bin in my refrigerator is always stocked with, fresh thyme, parsley, mint, cilantro, basil, and whatever other herb is in season--ALWAYS.  I can't imagine cooking without the use of fresh herbs.  At the same time, my cupboards are stocked with the dried version of all the fresh herbs that I just mentioned, and many, many other dry spices, like garlic powder, cumin, tarragon, onion powder...the list could literally fill this page!  If you've been following my blog, then you know that I make many of my own spices.   When the person in that forum asked about sourcing onion powder, my immediate thought was, why not just make it? So I did.  It's a simple process, but the onion powder that you get from this process is the best that you will probably ever taste--or smell--the smell had me salivating--this is the stuff that great onion dips, and soups are built from!
Pin It!


Prep time: 10 minutes
Cook time: 6-8 hours--
Ingredients:
2 large onions sliced thinly
Directions: Evenly spread the sliced onions on a dehydrator sheet.
image
If using an oven, place the onions on a parchment lined bake sheet. Set the temperature on your dehydrator to 125F.  If using an oven, set it to the lowest possible setting 150F.  Let the onions dehydrate until brittle, then remove and let cool.
image
Once the onions have cooled, place them in a spice grinder/coffee grinder and blend into a powder.  Stop here if you want onion flakes,
image
 
image
Transfer to an airtight container until ready to use.
 
image
 

Tuesday, February 10, 2015

Mango Ice Cream

Mango Ice Cream
Mango Ice Cream
My husband loves mango's and is especially fond of mango kulfi--an Indian ice cream.  It's a special treat that he likes to enjoy whenever we go out to eat at an Indian restaurant. Although Kulfi is delicious, most recipes call for corn flour as a thickening agent.  I prefer the use of egg yolks to thicken my ice cream.   This ice cream is ultra creamy, not as rich as a Kulfi, but delicious none the less.
Pin It!
Prep time: 30-45 minutes
Cook time: 10 minutes
Ingredients:
3 cups of organic mango puree
1.5 cups of organic milk
2 cups of organic heavy cream
4 egg yolks
1 vanilla bean
1/4 cup-1/2 cup of maple syrup more if you like it ultra sweet or if your mango's are not sweet
Directions:
In a medium bowl, beat together the yolks, and your sweetener of choice.
image
You can beat by hand using a whisk, or use a hand mixer. Beat until thoroughly smooth and creamy. (A couple of minutes by hand.) If you're using maple syrup, or agave, the mixture comes together quite quickly.
image
Put 1 cup of the cream, and all of the milk, into a medium saucepan over medium heat.
image
Scrape the vanilla seeds from the bean with the tip of a small knife, and place into the pan; add the pod too. Heat the mixture until just before it starts to simmer (DO NOT LET IT SIMMER). Remove mixture from heat.Strain the hot mixture, reserving the milk and discarding thevanilla bean pod.
image
Add half of the hot mixture to the egg-yolk mixture, and whisk until blended. Be careful when adding the hot mixture to the egg mixture, go slowly you don't want scrambled eggs.  Stir this mixture into remaining hot mixture in the sauce pan,add the last cup of heavy cream and cook over low heat, stirring constantly, add in the mango puree,and cook until mixture is thick enough to coat the back of a wooden spoon.
image
Remove from heat.  Quickly cool the mixture by pouring the hot mixture into a bowl over an ice bath, or let it cool to room temperature for at least 30 minutes. Once the cream has cooled sufficiently, freeze in an ice-cream maker according to manufacturer's instructions.
image
If you don't have an ice cream maker, check out this Link to see how make ice cream without one.
image
You could also freeze the cream in popsicle molds, or make a instant pop in a Zoku Quick Pop Maker--like I did below!
 image
image

Wednesday, February 4, 2015

Roasted Cabbage Wedges with Cider Herb Vinaigrette

Roasted Cabbage Wedges with Cider Herb Vinaigrette
One of my favorite winter vegetables is cabbage.  I love it in a hearty soup, braised in a crock on the stove, or roasted in the oven. Cabbage seems to be one of those vegetables for me that not matter how I cook it, it's comforting in every way! This recipe is a favorite of mine, the roasted cabbage alone is awesome, but the vinaigrette really takes it to another level!
Pin It!
 
 
Prep time: 5 minutes
Cook time: 15 minutes
 
Ingredients:
1 small head of cabbage quartered with core intact, so it doesn't fall apart
3-4 tablespoons of oil
4 cloves of garlic sliced thinly
sea salt and black pepper to taste
Vinaigrette
2 tablespoons of Apple cider vinegar
1 tablespoon of mustard oil
1 tablespoon of finely chopped cilantro
sea salt to taste
 
Directions: Add the ingredients for the vinaigrette to a bowl, mix well and set aside.
image
Pre-heat the oven to 425F.
image
Add the cabbage to a foil lined bake sheet, then drizzle with oil  and season with sea salt and black pepper on both sides. Lastly top with sliced garlic, and place in the oven.
image
Cook  for 10-15 and cabbage takes on some color.  Remove from oven, drizzle each wedge with some of the vinaigrette, serve and enjoy!
 
image

image
If you like this recipe check out my recipes for Indian Spiced Cabbage and Ground Chicken and Cabbage Curry!
Follow and Like me on Facebook: www.facebook.com/lazygirldinners

Tuesday, February 3, 2015

DIY BBQ Rub--Lazy Girl All Purpose Barbecue Seasoning

Lazy Girl BBQ Spice Rub
By now you know that I love to make my own dry rubs and seasonings. I am a particular fan of the Trader Joe's brand BBQ rub, but it's not organic, and it contains sugar.  So of course I had to make my own version--without the sugar. I find that most things that call for sugar, either need less than the recipe calls for, or  don't need it at all.  If you want to add sugar to this, then by all means add it, 1 teaspoon of maple sugar won't kill you, but it really isn't necessary for this recipe, this seasoning is fantastic all own its own. Also a bit of spice is nice in the recipe but I have made it optional.  My daughter isn't a fan of spicy foods, so I often leave the spice as a later addition for the grown ups.  This truly is an all purpose seasoning, it taste great on chicken, pork, tofu, or steak.
Pin It!


Prep time: 5 minutes
Cook time: none
Ingredients:
2 teaspoons of smoked paprika
1 teaspoon of onion flakes (can sub onion powder)
1 teaspoon of satsuma powder (can sub 2 teaspoons of orange zest)
1 teaspoon of cumin
1 teaspoon of ground coffee
1 teaspoon of himilayan sea salt
1/2 teaspoon of red pepper flakes (optional)
 
Directions: Add all ingredients to a small bowl,
image
Mix well:
imageTransfer to an air tight container until ready to use:
image
 
This is such a great seasoning, and it's not just something to use on grilled meats.  I used it to make oven roasted barbecue chicken the other night, and it was a huge hit!
 
image
 
Follow and like me on Facebook:  www.facebook.com/lazygirldinners